
死海は自然の驚異であり、その治療効果は何世紀にもわたって知られてきました。人々は、死海のユニークなミネラル組成、特に死海の塩の効果を体験するために、世界中から旅をしています。この包括的なガイドでは、死海の驚異を探求し、その秘密を解き明かし、死海の塩をあなたの健康と美容のルーチンに取り入れることの多くの利点を共有します。

旅行プランはご自身で決めれば安くても満足!!
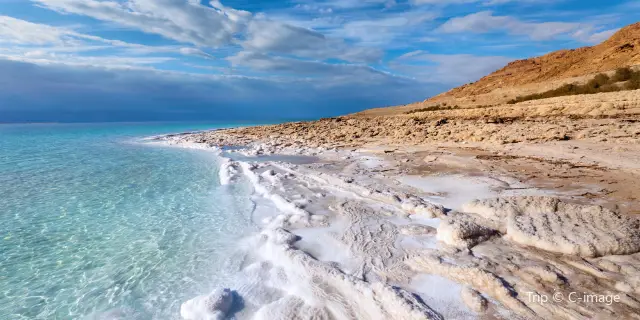
死海の歴史と地理
死海はヨルダンとイスラエルの間に位置し、地球上で最も低い場所にあります。また、塩分濃度が約33%と、世界で最も塩分濃度の高い水域でもあります。死海は何千年も前から治療効果があるとされ、聖書にはダビデ王の避難場所として登場するほどです。
死海に含まれるミネラル豊富な泥と塩は、何世紀にもわたってその治癒効果を利用されてきました。古代エジプト人は死海の塩を美容に利用し、ローマ人は死海に温泉を作り、その治療効果を利用していました。今日、世界中の人々がその癒しの力を体験するために死海を訪れています。
死海の塩がもたらす肌の健康への影響
死海の塩は、古くから肌を癒す効果があるとして利用されてきました。マグネシウム、カルシウム、カリウムを含むそのユニークなミネラル組成は、肌に栄養と水分を与えるのに役立ちます。また、死海の塩は、肌の質感やトーンを向上させ、小じわを目立たなくさせる効果も期待できます。
死海の塩には、炎症を起こした肌を鎮め、落ち着かせる効果があることでも知られています。湿疹、乾癬、にきびなど、どのような症状でも、死海の塩に含まれるミネラルが炎症を抑え、治癒を促進します。また、死海の塩は天然の角質除去剤でもあり、古い角質を取り除き、健康な肌の再生を促進します。
死海の塩のリラックス効果、ストレス解消効果について
死海の塩は、肌を癒す効果に加え、リラクゼーションやストレス解消の効果もあることで知られています。死海の塩を入れた温かいお風呂に浸かると、ストレスを軽減し、リラクゼーションを促進することができます。死海の塩に含まれるマグネシウムは、神経系を落ち着かせる効果があることで知られており、不安を軽減し、穏やかな感覚を促進するのに役立ちます。
死海の塩浴は、筋肉の痛みや関節の痛みを和らげる効果もあります。温水と塩に含まれるミネラルが血流を良くし、炎症を抑え、治癒を促進する効果があります。関節炎やその他の関節疾患にお悩みの方は、死海の塩風呂に浸かることで緩和されるかもしれません。
死海の塩の呼吸器系への効果について
死海の塩は、皮膚や筋肉に有効なだけでなく、呼吸器の健康にも役立つことがあります。死海の塩風呂の蒸気を吸い込むと、副鼻腔がすっきりして呼吸器の健康が促進されます。塩に含まれるミネラルが呼吸器系の炎症を抑え、呼吸をしやすくしてくれます。
死海の塩は、鼻づまりや副鼻腔の圧迫感を和らげるために、生理食塩水の鼻腔スプレーとして使用することもできます。死海の塩をぬるま湯に溶かし、鼻腔スプレーとして使用するだけです。風邪やインフルエンザで鼻づまりを起こしやすい季節には、特に効果的です。
スキンケアと美容のための死海の塩の使用方法
死海の塩をスキンケアや美容のルーチンに取り入れる方法はたくさんあります。最もシンプルな方法は、お風呂に死海の塩を入れることです。カップ1杯の死海の塩をぬるま湯に溶かし、20~30分浸かるだけです。肌に栄養と潤いを与えながら、リラックスとストレス解消を促すことができます。
死海の塩は、さまざまなDIY美容法にも利用することができます。ハチミツやオリーブオイルと混ぜて栄養たっぷりのフェイスマスクにしたり、ココナッツオイルや砂糖と合わせてナチュラルなボディスクラブを作ったりできます。また、死海の塩をシャンプーに混ぜると、頭皮の角質を除去し、健康な髪の成長を促進することができます。
家庭でできる死海の塩を使ったDIYレシピを紹介
死海の塩を使ったDIY美容法をお探しの方に、いくつかのアイデアをご紹介します:
死海の塩のフェイスマスク
材料はこちら – 死海の塩 大さじ1 – はちみつ 大さじ1 – オリーブオイル 大さじ1
指示する: 1.小さなボウルにすべての材料を入れて混ぜ合わせる。 2.顔全体に塗布し、10~15分放置します。 3.ぬるま湯で洗い流します。
死海の塩のボディスクラブ
材料はこちら – 死海の塩 1カップ – ココナッツオイル ½カップ – 砂糖 ½カップ – エッセンシャルオイル5滴(お好みで)
指示する: 1.小さなボウルにすべての材料を入れて混ぜ合わせる。 2.円を描くようにボディに塗布します。 3.ぬるま湯で洗い流します。
死海の塩の製品を試してみる
自分で美容法を作るのはちょっと…という方でも、死海の塩製品はたくさん販売されています。バスソルトからボディスクラブ、フェイシャルマスクまで、多くの選択肢から選ぶことができます。ここでは、いくつかの製品をご紹介します:
- アハバ デッドシーソルト バスソルト
- デッドシーウェアハウス オリジナルソルトスクラブ
- アドヴィア デッドシー マッドマスク
死海の塩を購入できる場所
死海の塩は、オンラインまたは自然健康・美容製品の専門店で購入することができます。100%純粋な死海の塩を使用し、添加物や防腐剤を使用していない製品を探してみてください。人気のブランドには、Ahava、Adovia、Dead Sea Warehouseなどがあります。
In Closing, Incorporate Healing Power of Dead Sea Salt
肌の健康増進、ストレスの軽減、呼吸器の健康促進など、死海の塩の癒しのパワーは探求する価値があります。DIY美容法から市販の製品まで、死海の塩をあなたの健康と美容のルーチンに取り入れる方法はたくさんあります。ぜひ試してみて、その効果を実感してみてください。


コメント